GodbaseRust base builder & raid calculator

Popular Build Styles: Wide Gaps

A wide gap is a shooting floor on outer wall frames, with an open slit between it and your core wall, so you can shoot straight down the wall. The trick is in the foundations: the outer ones land just off your base's grid. Here is every gap you can make that way, measured, with the least triangles (the numbers show the order), shown with the game's own models.

How the gap size works

The method guides teach: build square foundations straight out from the wall, delete them, and come back toward the base with triangle foundations, so the outer foundation lands off the base's grid. Then put wall frames on it and floors on the frames. (LevelSkip 2023; RustBases.gg April 2026; Kredbic, September 2026)

Why it works, measured in the Godbase builder: a row of square foundations is 3 m deep but a row of triangles only 2.598 m, so each triangle row lands 0.402 m short of where a square row would. Builders name two kinds, triangle wide gaps and square wide gaps. (Maphhew 2022; Kredbic 2026) On this page that means the piece next to the base is a triangle or a square. The guides don't give widths in metres; the widths below are our measurements from the game's foundation sizes.

Width (measured)GapHowTrianglesKind
0.19 mSeven-row square gap7 triangle rows out, 6 squares back14Square wide gap
0.40 mOne-triangle gap2 squares out, 1 triangle row back2Triangle wide gap
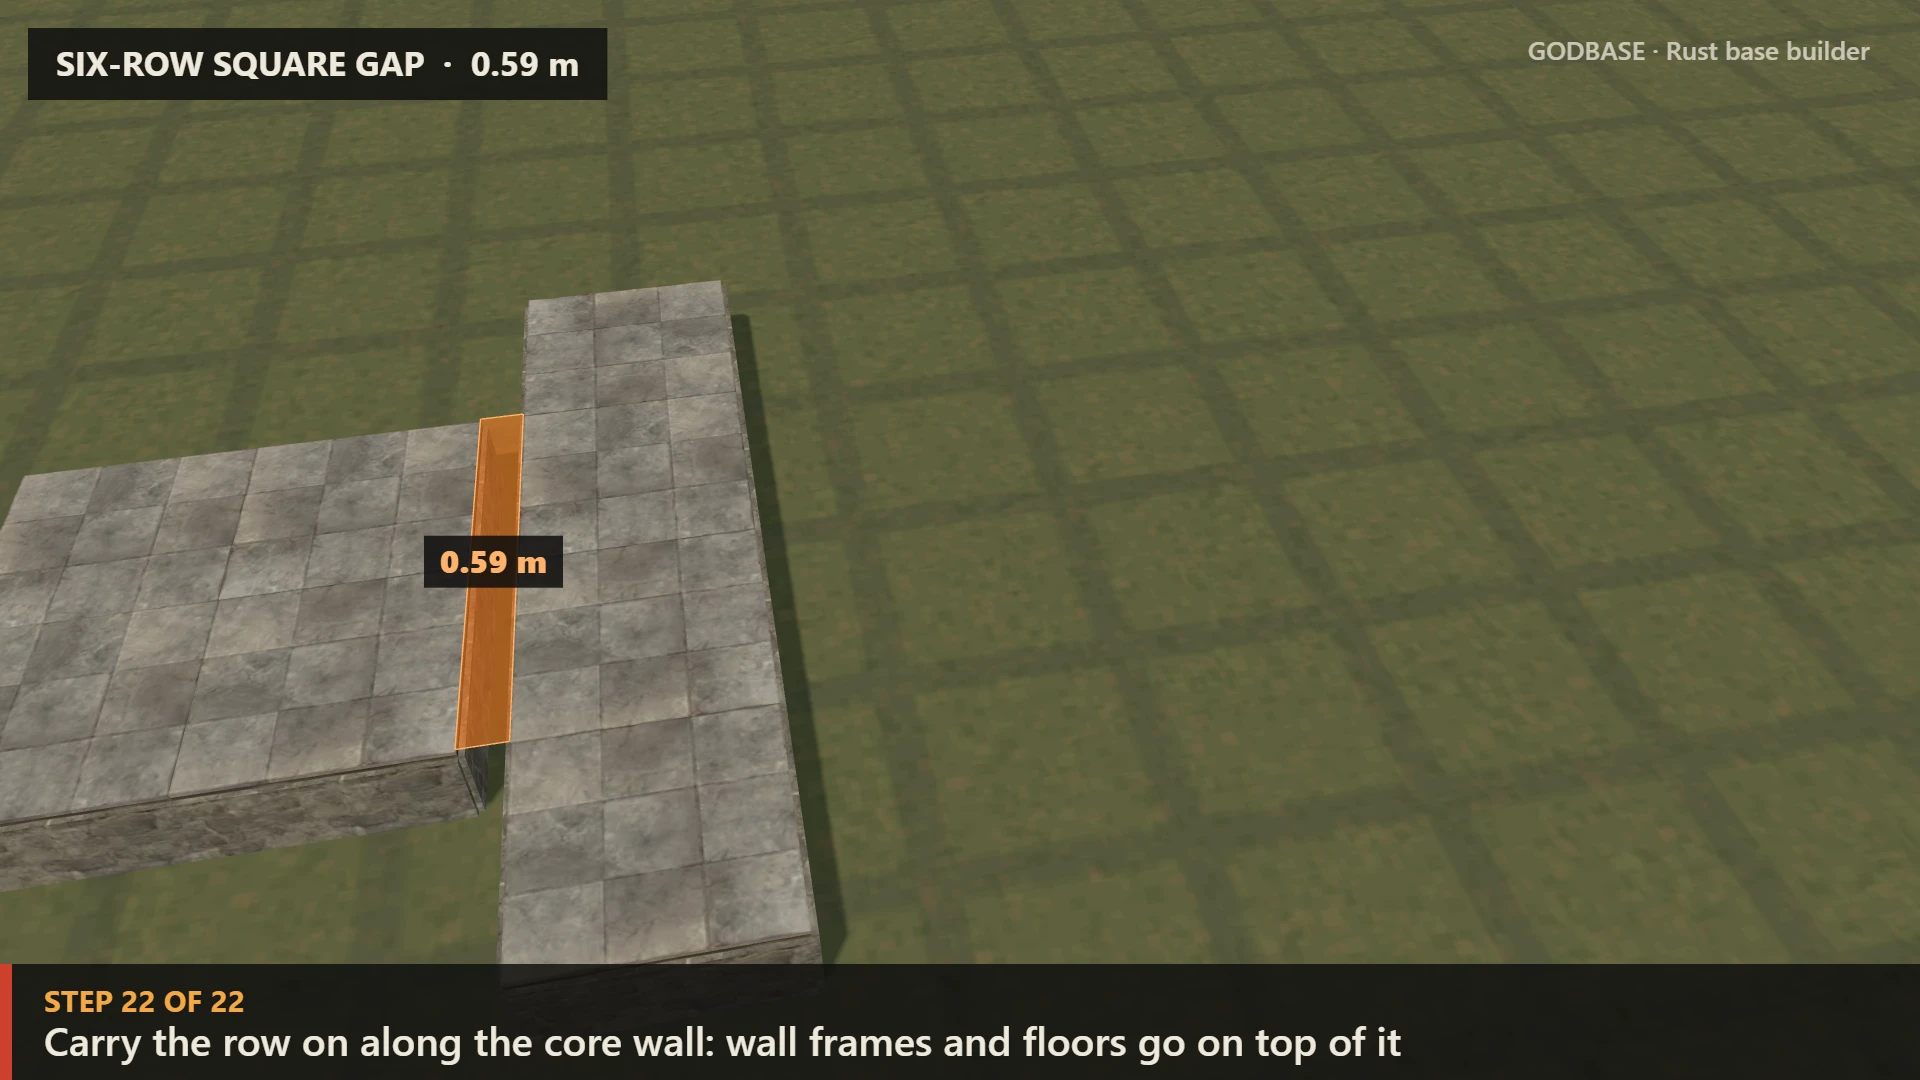
0.59 mSix-row square gap6 triangle rows out, 5 squares back12Square wide gap
0.80 mTwo-triangle gap3 squares out, 2 triangle rows back4Triangle wide gap
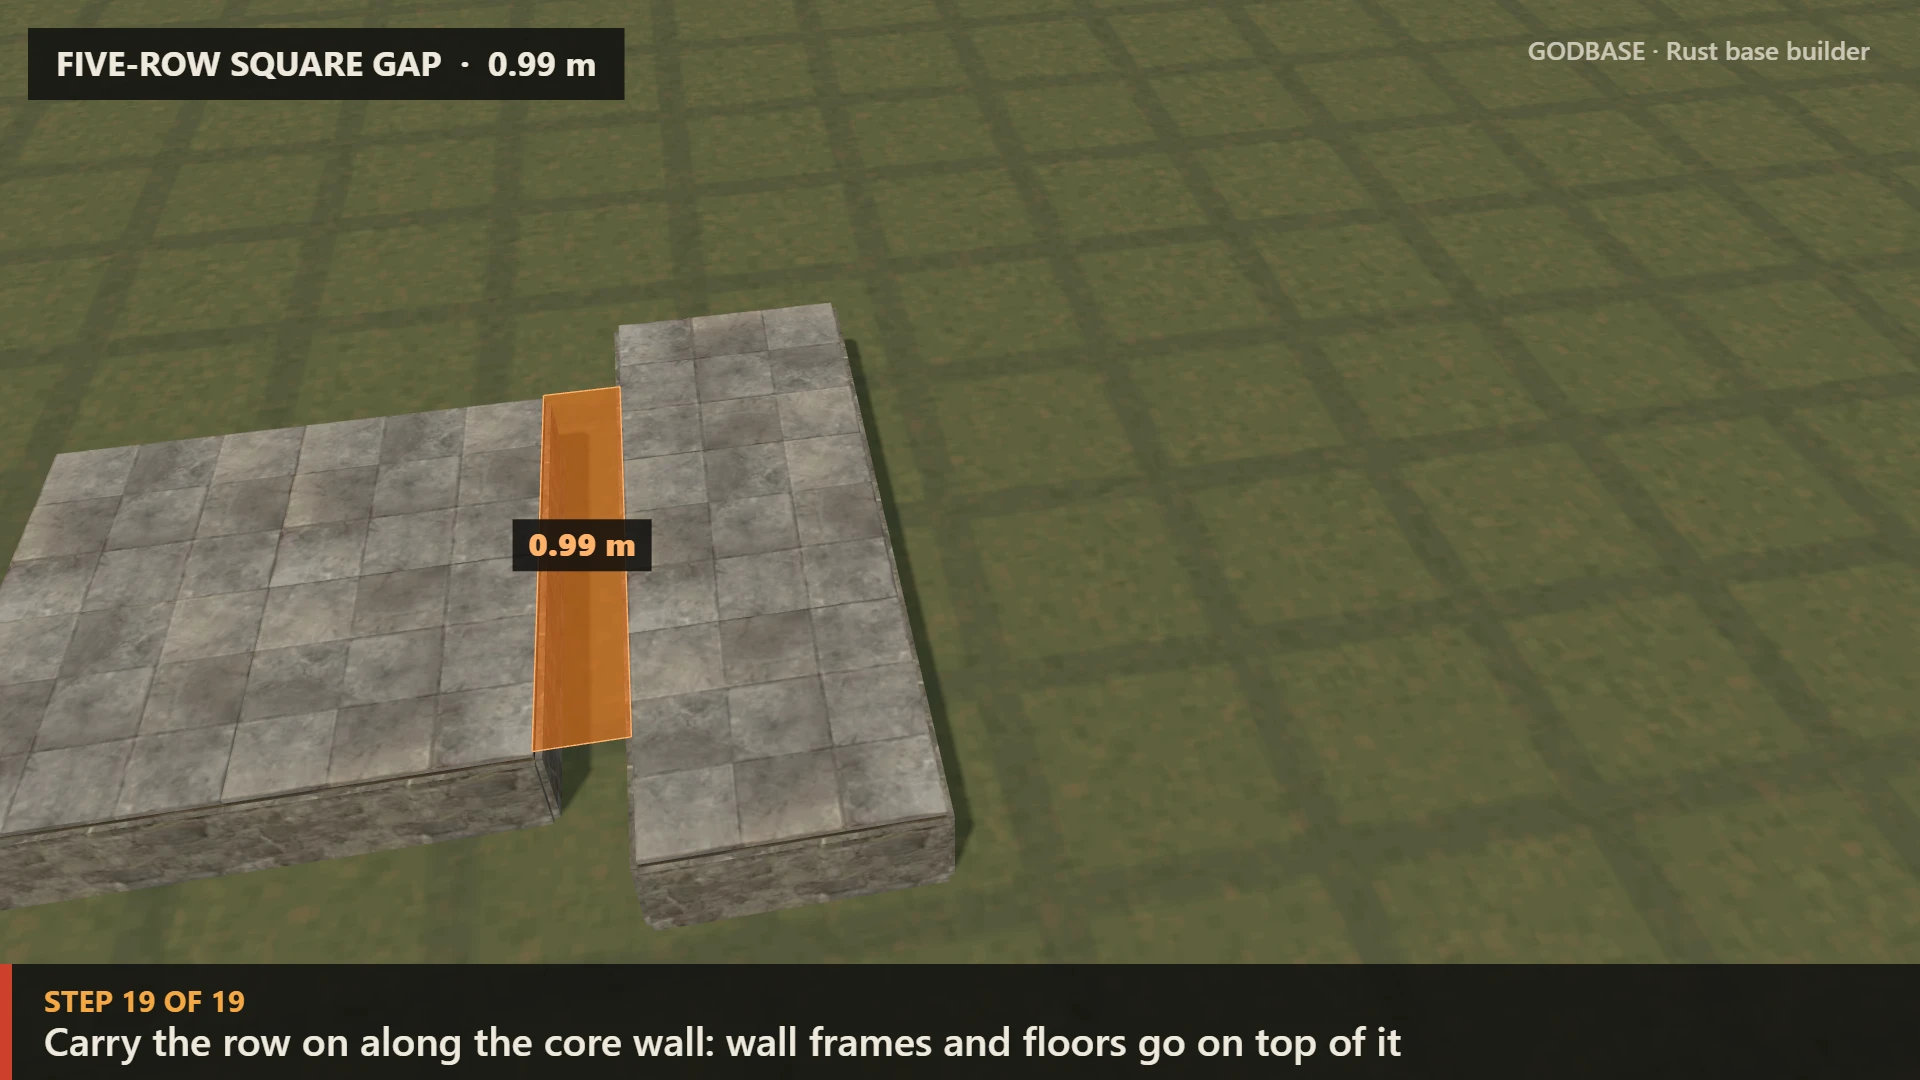
0.99 mFive-row square gap5 triangle rows out, 4 squares back10Square wide gap
1.21 mThree-triangle gap4 squares out, 3 triangle rows back6Triangle wide gap
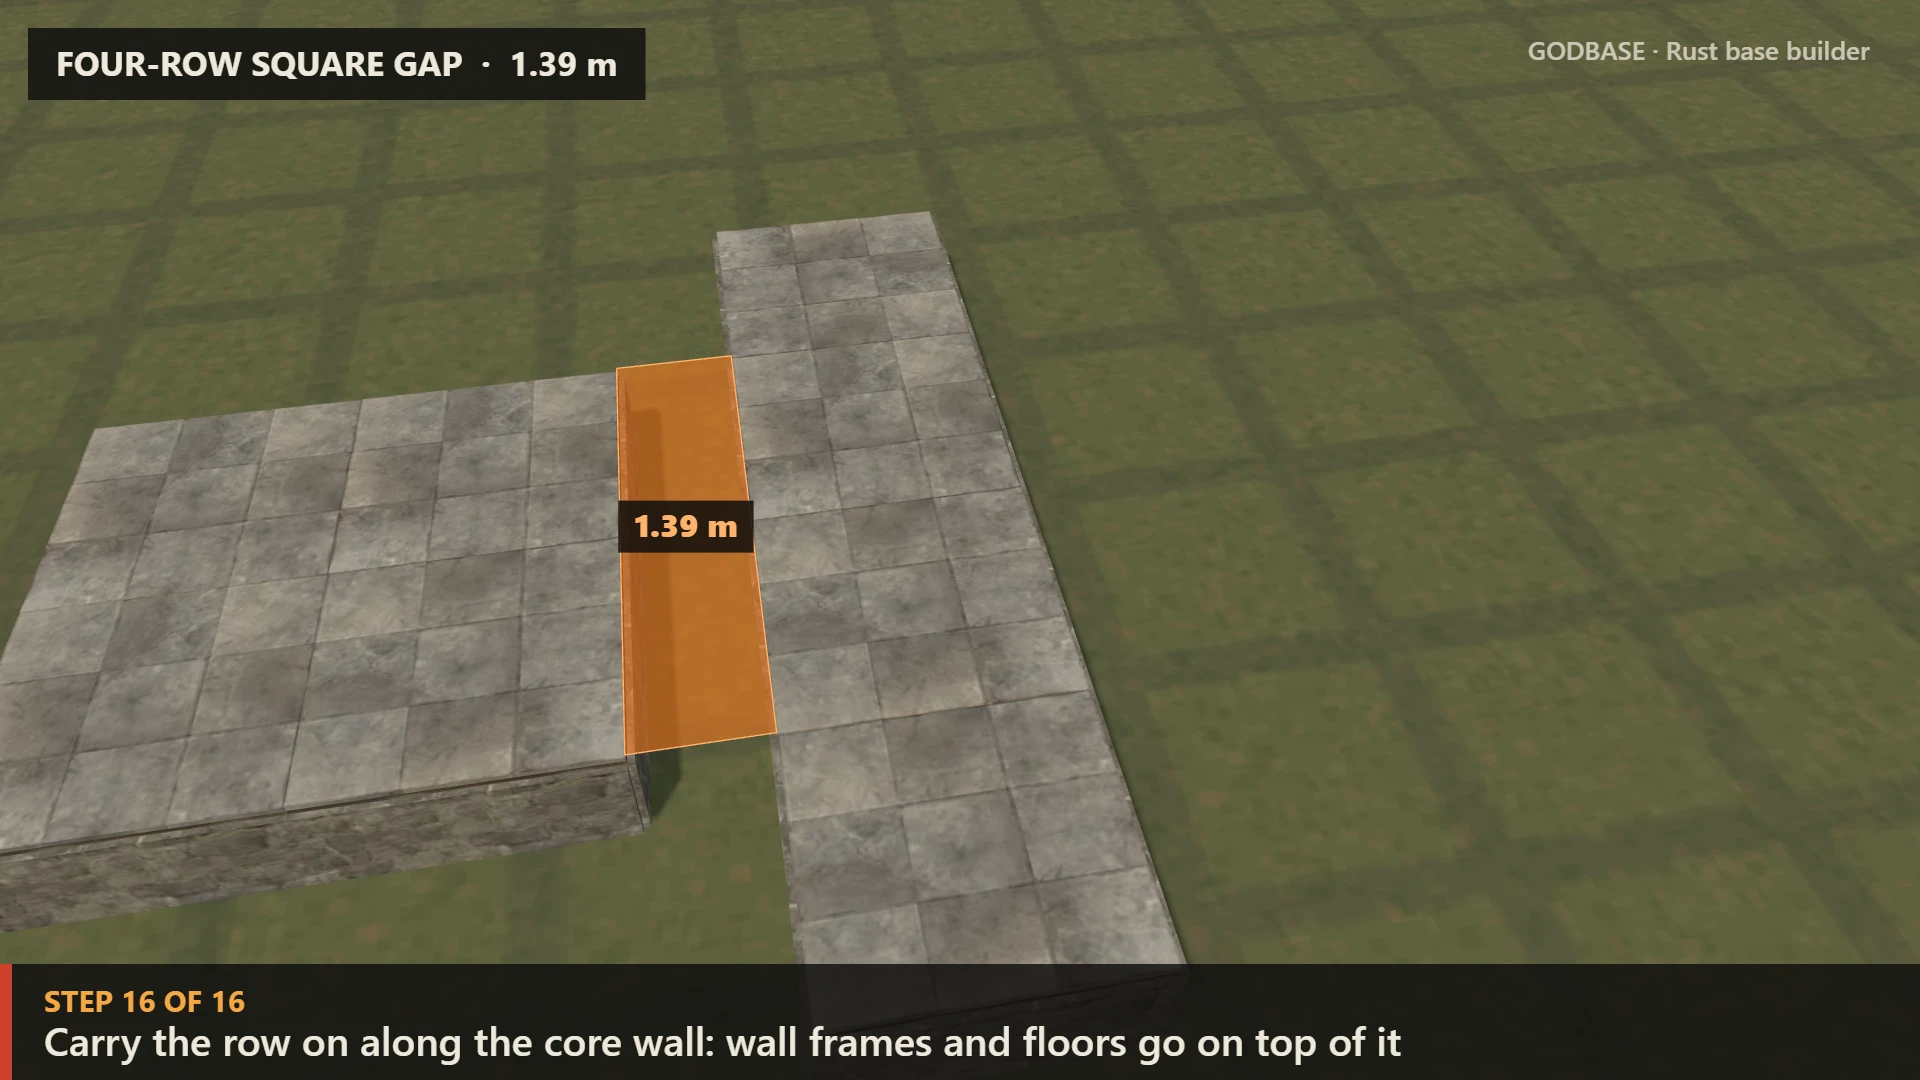
1.39 mFour-row square gap4 triangle rows out, 3 squares back8Square wide gap
1.61 mFour-triangle gap5 squares out, 4 triangle rows back8Triangle wide gap
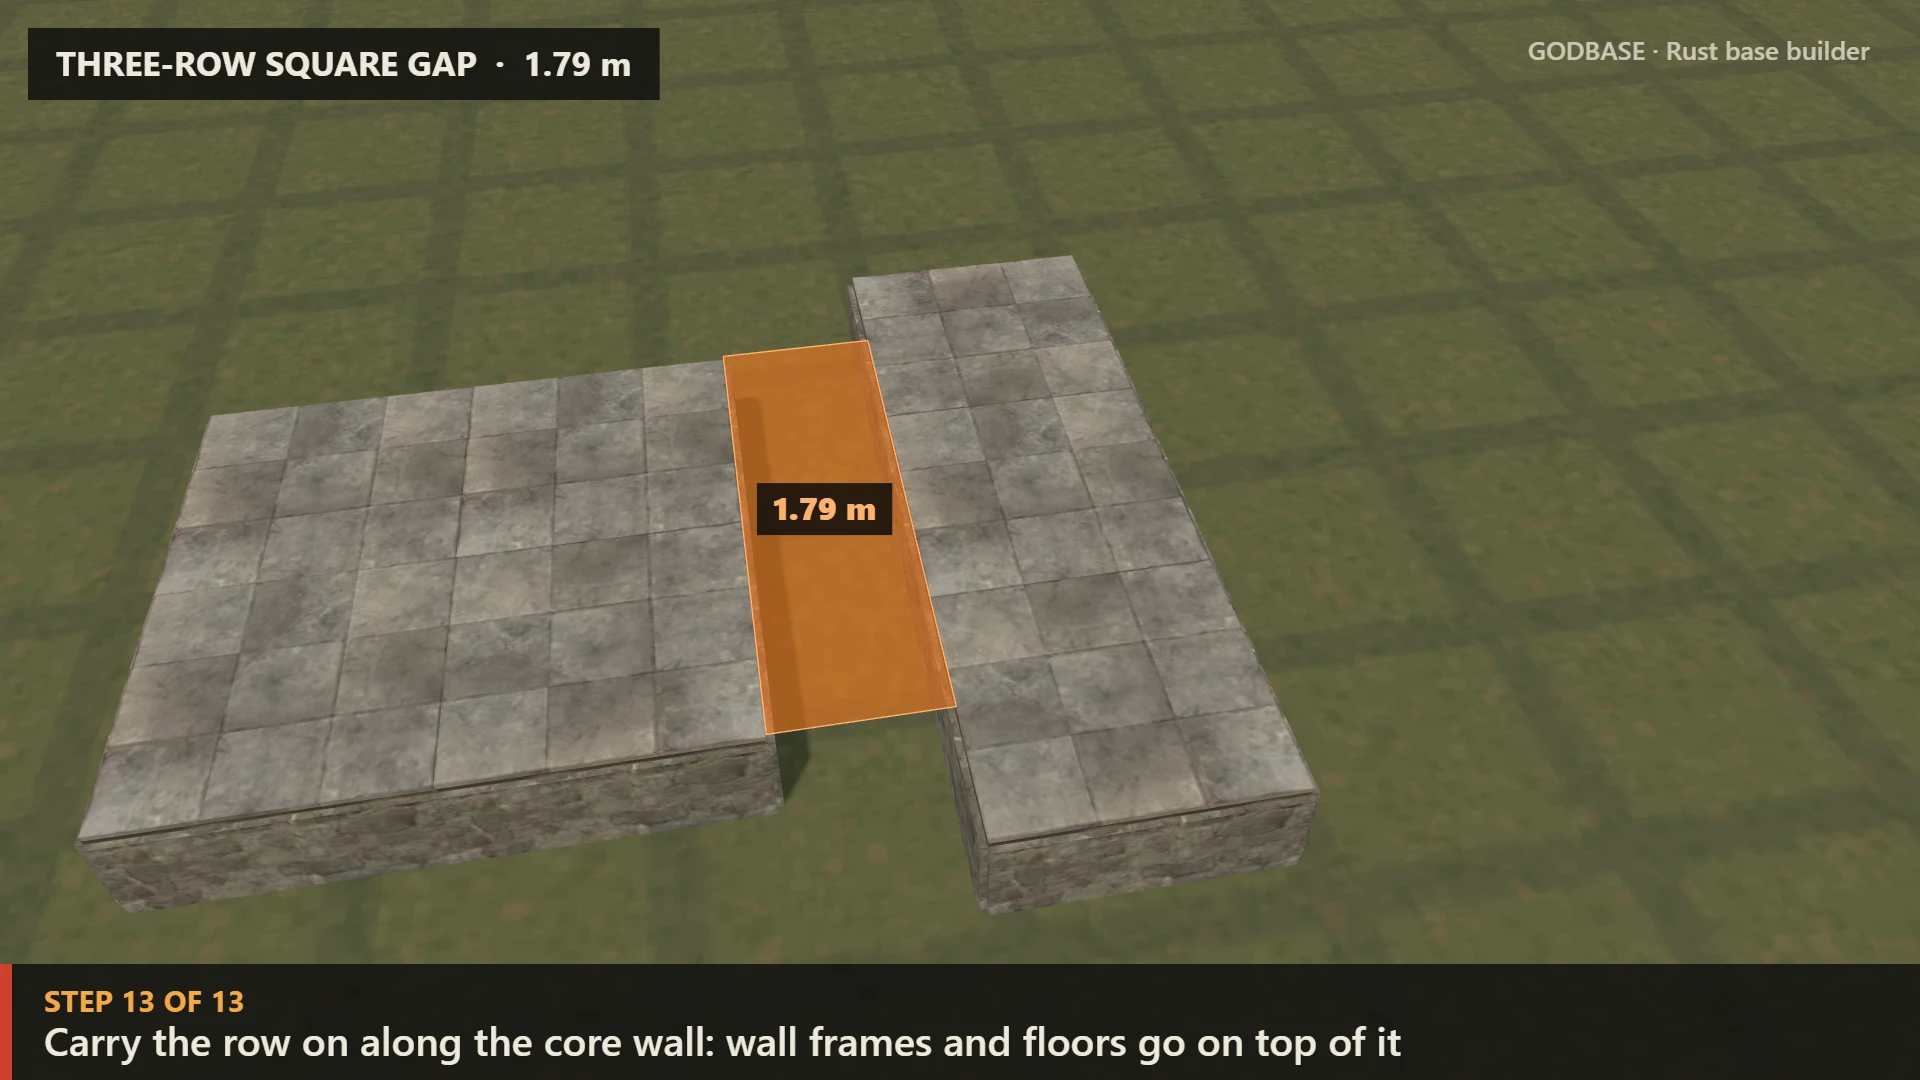
1.79 mThree-row square gap3 triangle rows out, 2 squares back6Square wide gap
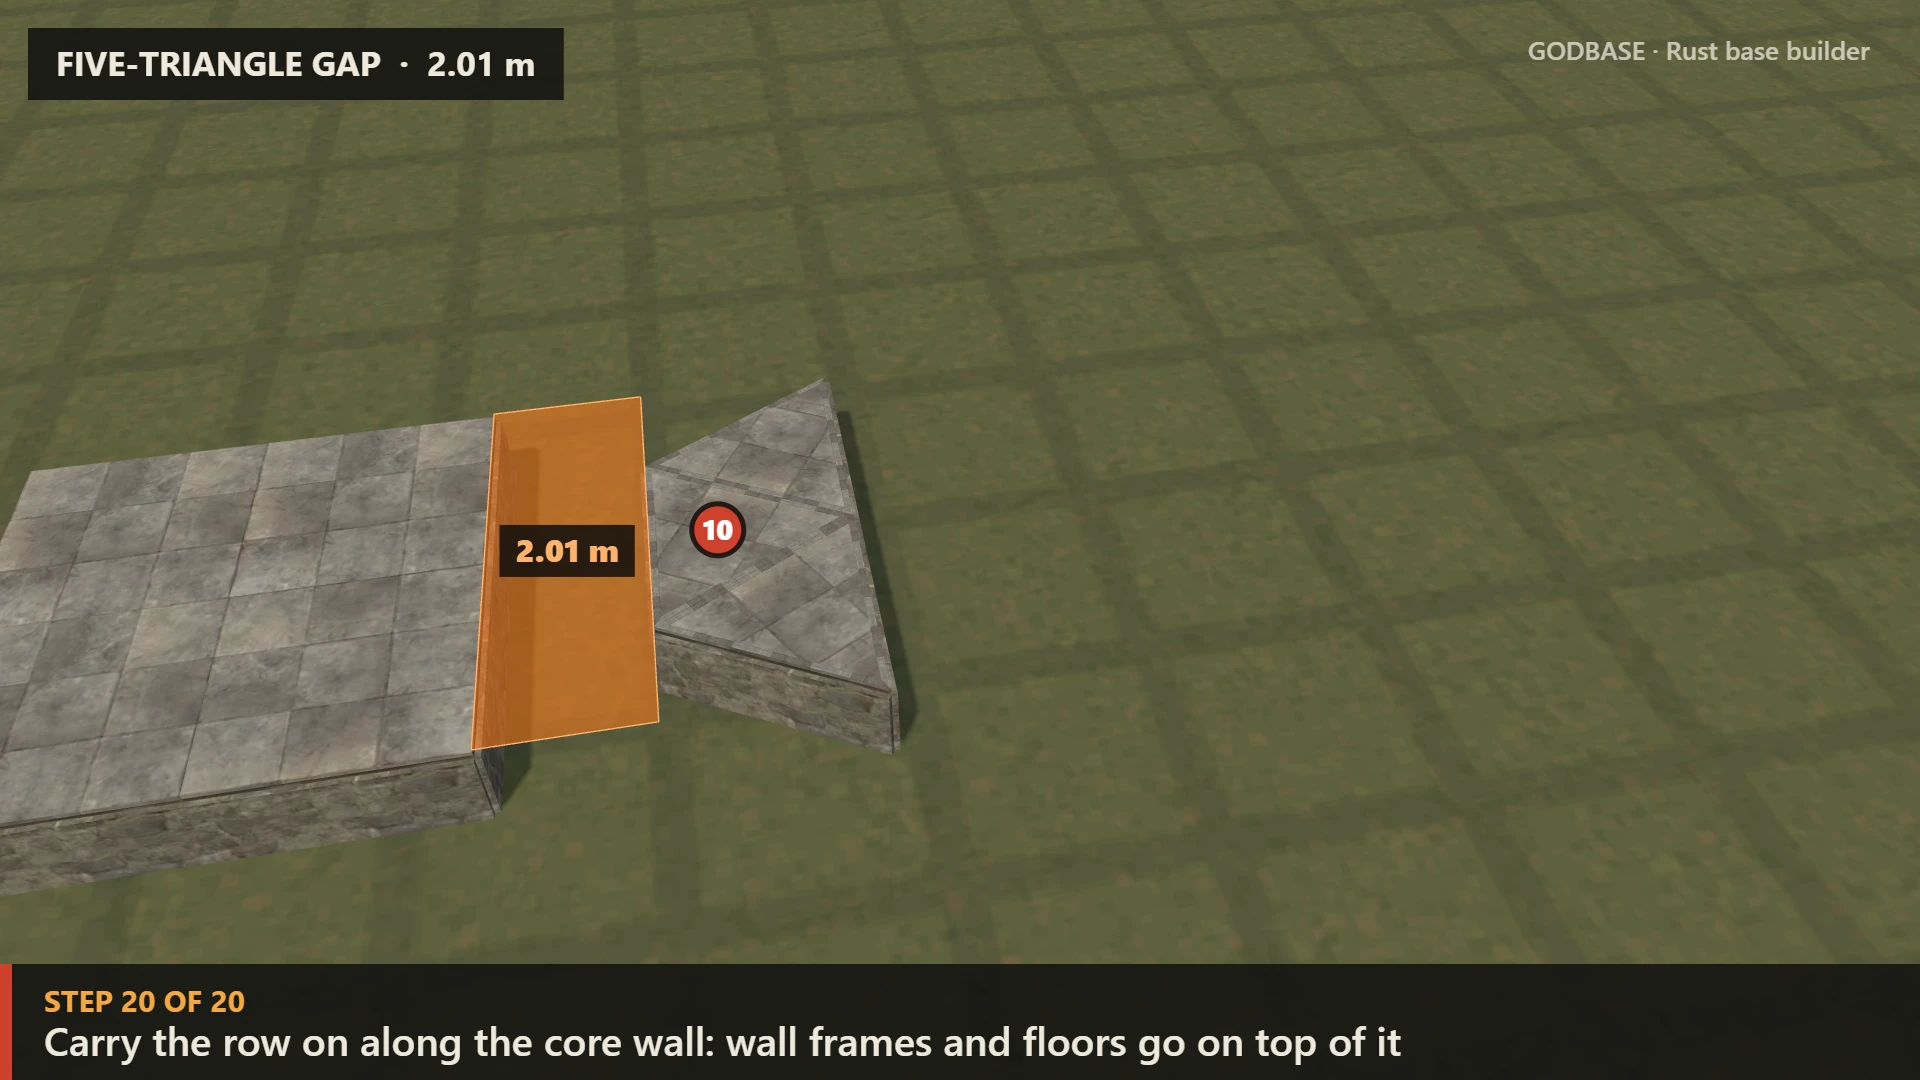
2.01 mFive-triangle gap6 squares out, 5 triangle rows back10Triangle wide gap
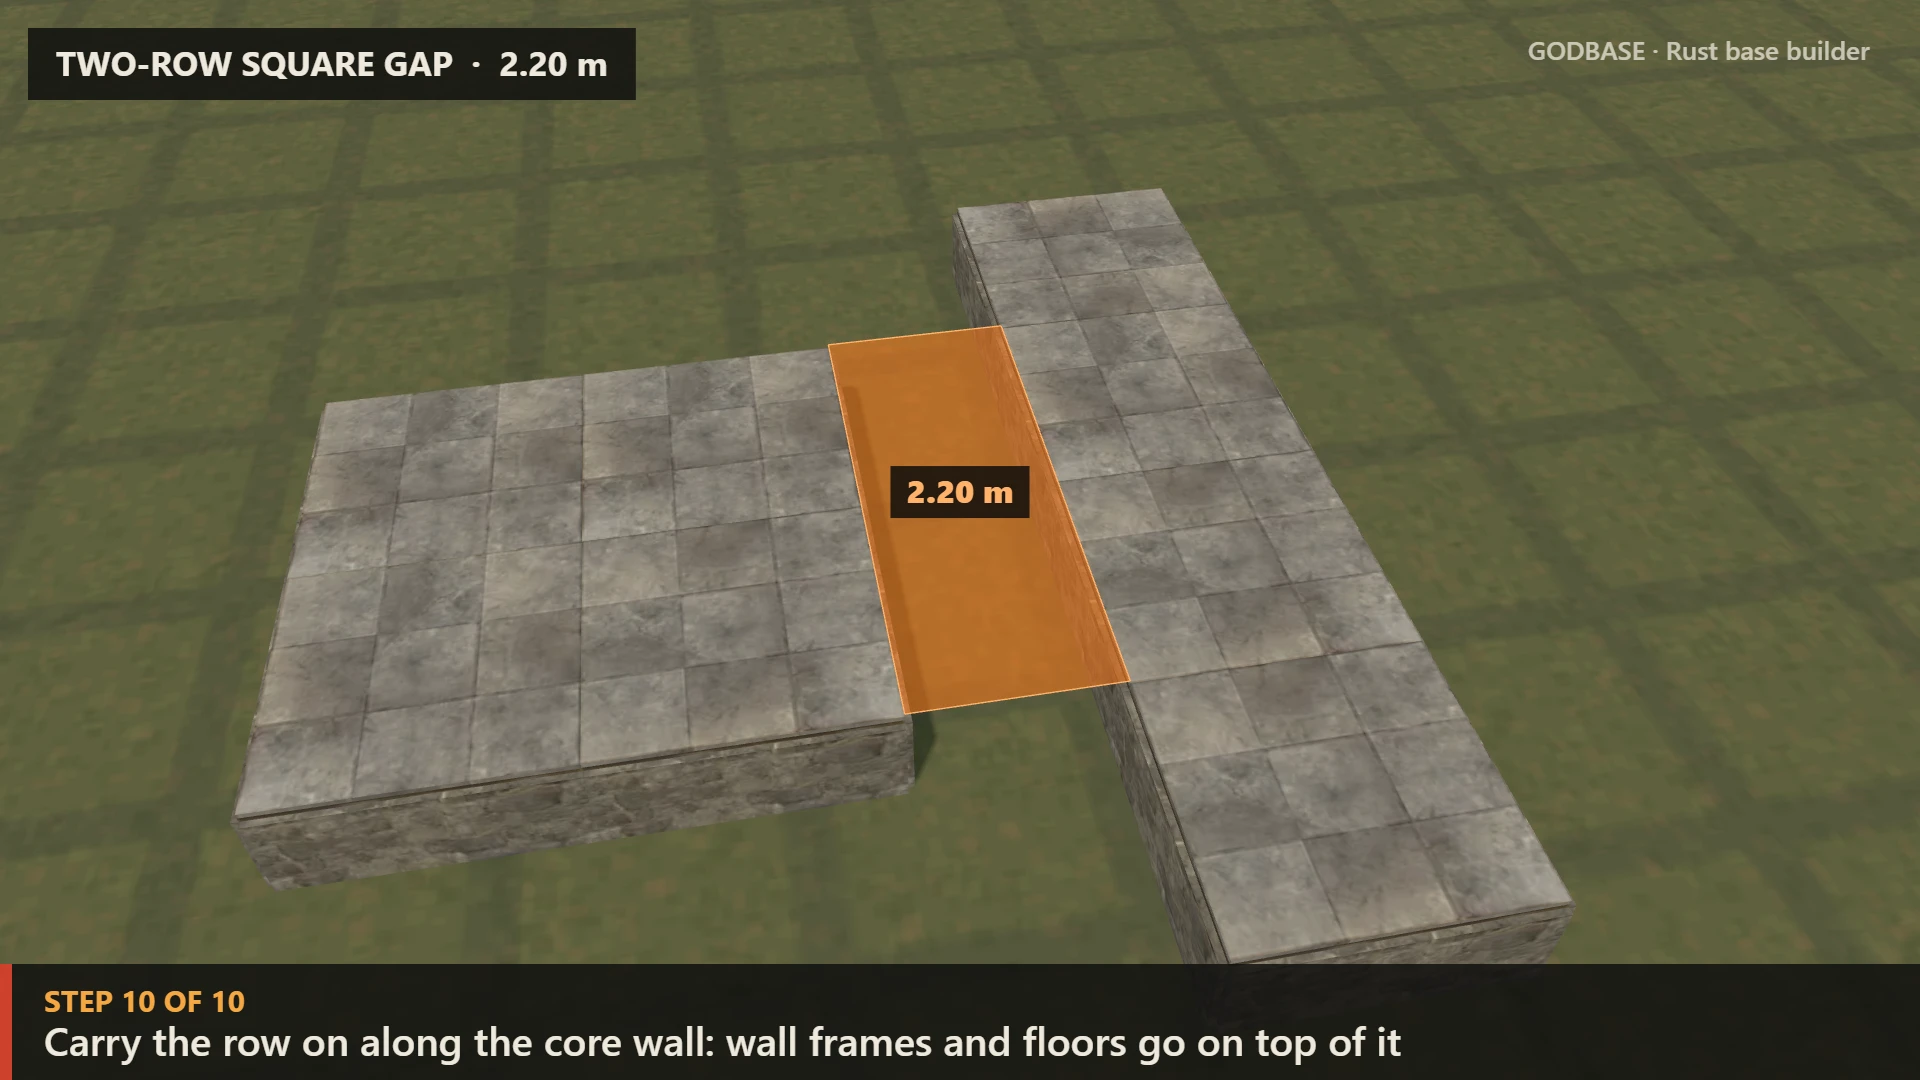
2.20 mTwo-row square gap2 triangle rows out, 1 square back4Square wide gap
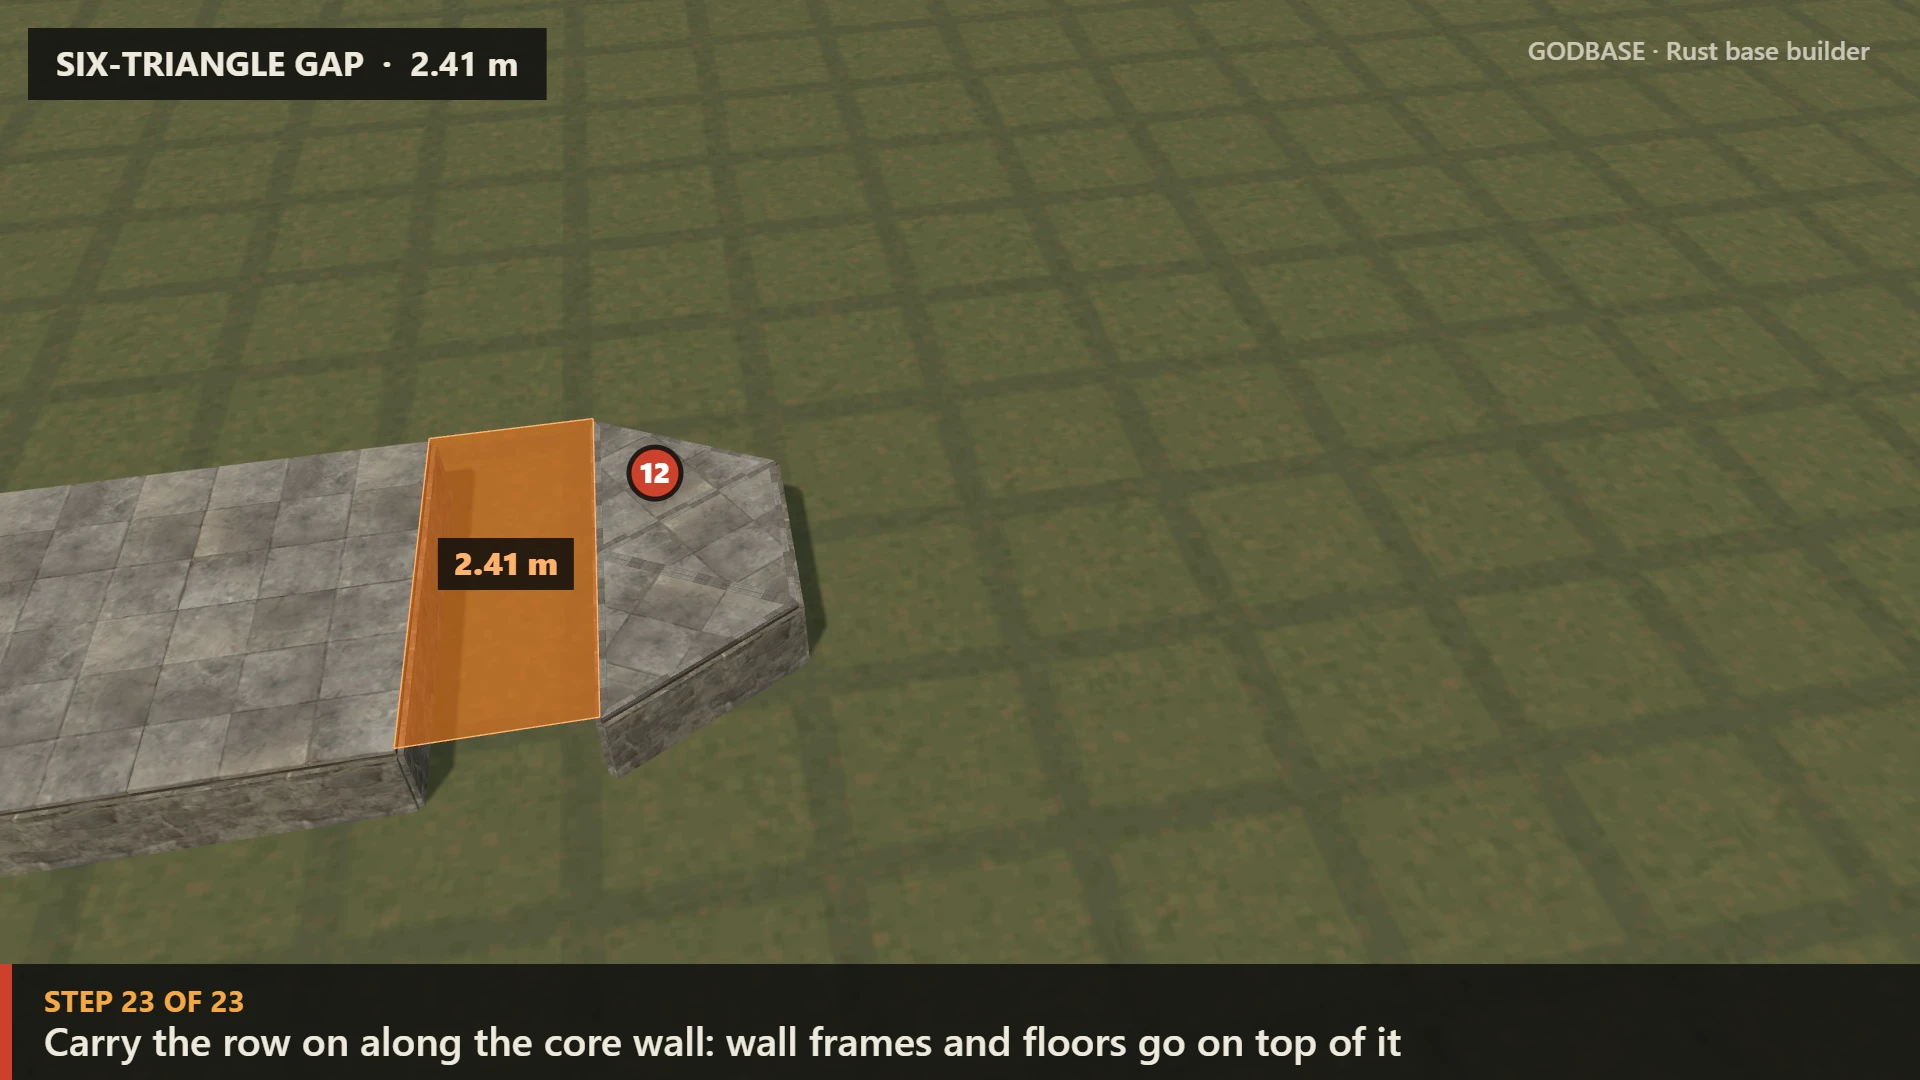
2.41 mSix-triangle gap7 squares out, 6 triangle rows back12Triangle wide gap
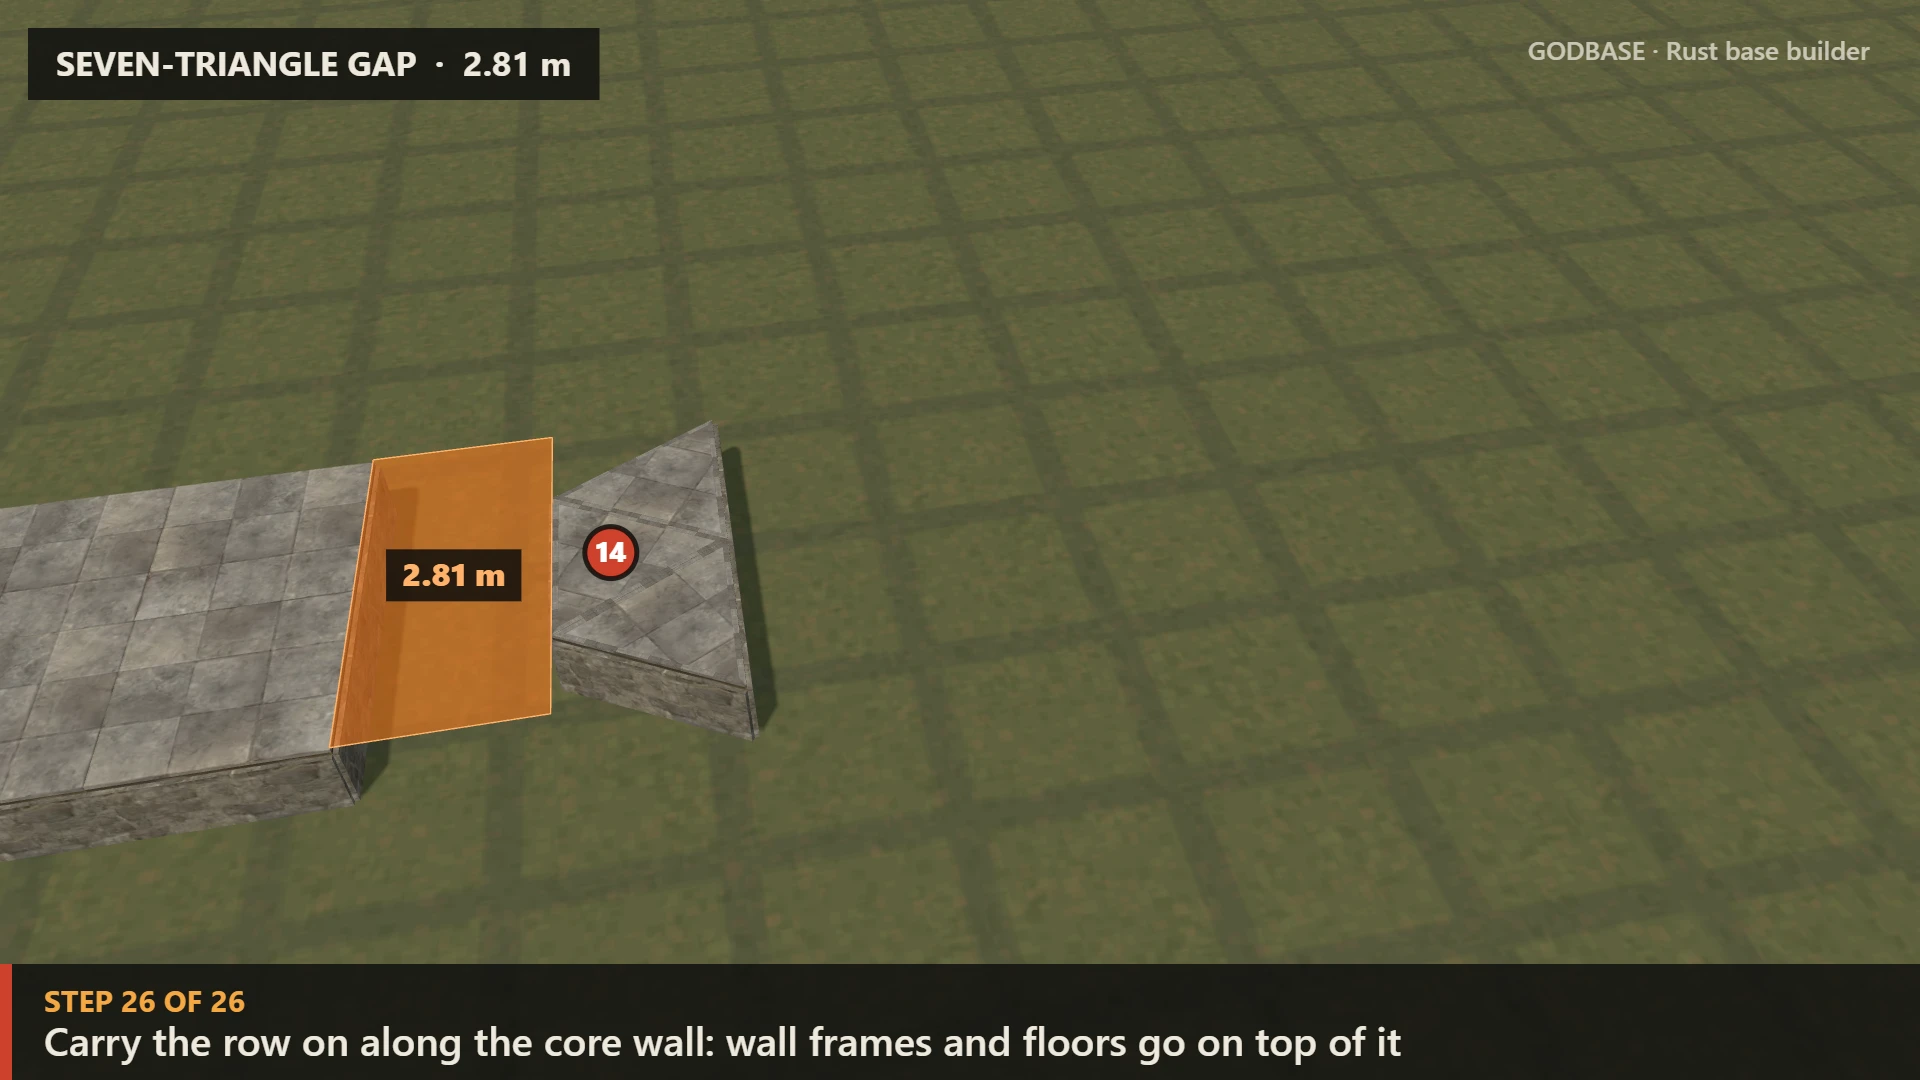
2.81 mSeven-triangle gap8 squares out, 7 triangle rows back14Triangle wide gap; a triangle fits inside it

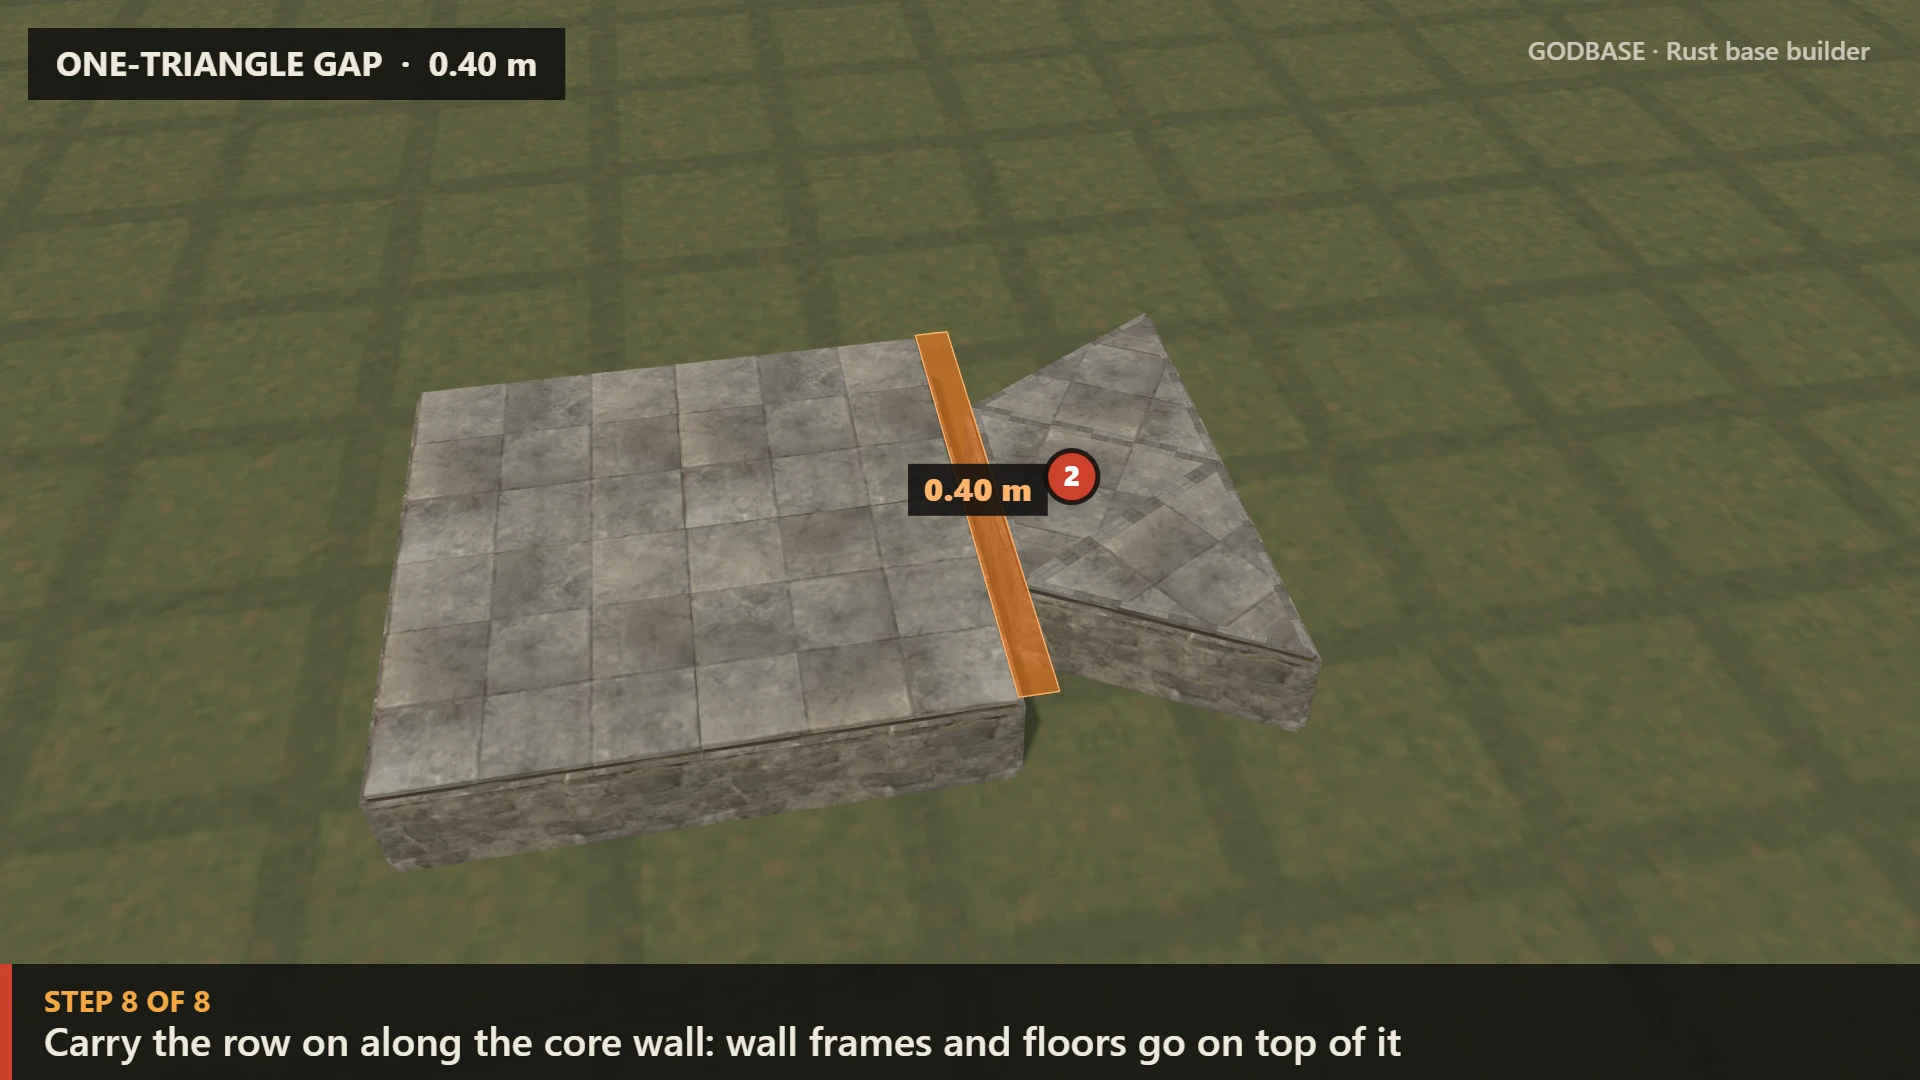
One-triangle gap

0.40 m
One-triangle gap: a stone core and a row of triangle foundations 0.40 m away, with the gap marked in orange

A triangle wide gap: one row of triangles back, so the piece next to the core is a triangle. Measured in the builder at 0.40 m.

Gap
0.40 m measured (1 × 0.40 m)
Squares out
2, then delete all but the far one
Triangles back
2 (the least you need: 2 per row)
  1. Lay 2 square foundations straight out from the core wall
  2. Delete all but the far square
  3. Triangles 1 and 2: row 1 back toward the core
  4. Delete the helpers and keep only the last triangle next to the core: that is your 0.40 m gap
  5. Carry the row on along the core wall from that piece: wall frames and floors go on top of it

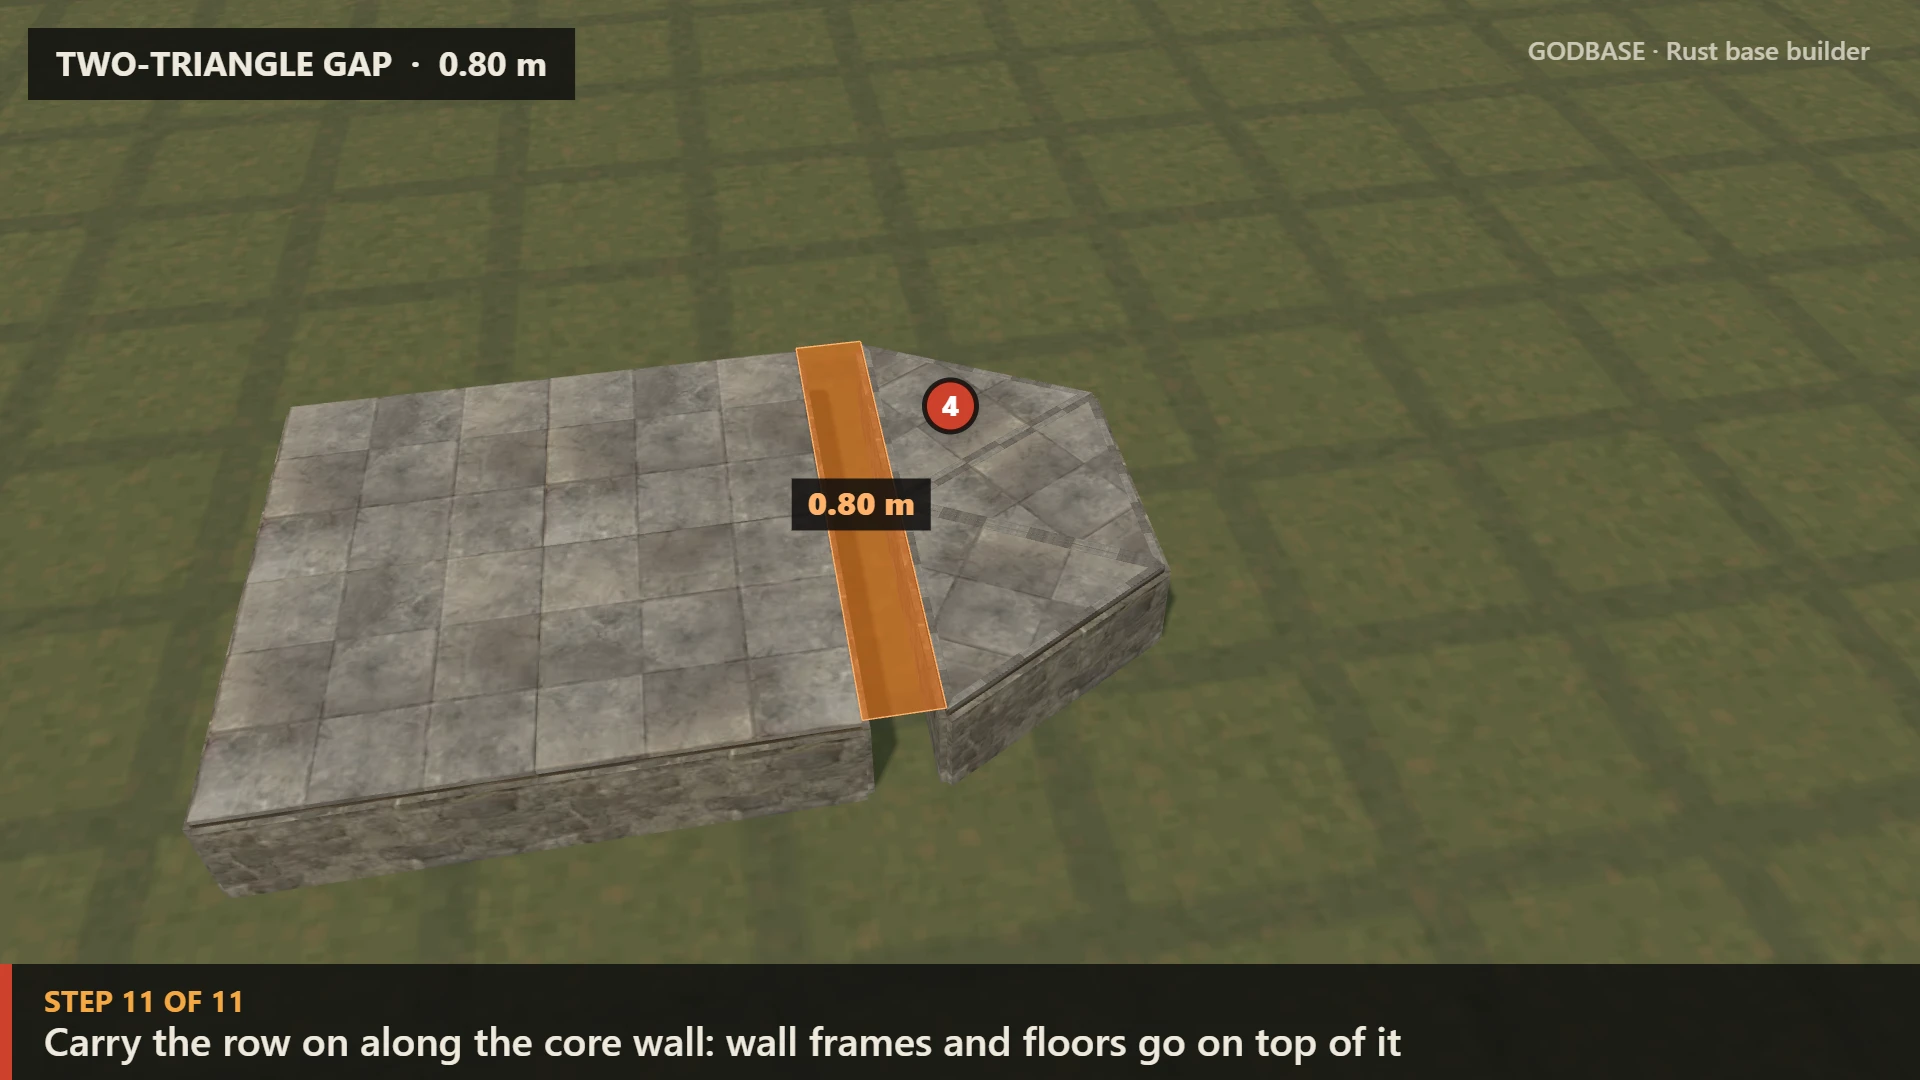
Two-triangle gap

0.80 m
Two-triangle gap: a stone core and a row of triangle foundations 0.80 m away, with the gap marked in orange

A triangle wide gap with two rows of triangles back. Measured in the builder at 0.80 m.

Gap
0.80 m measured (2 × 0.40 m)
Squares out
3, then delete all but the far one
Triangles back
4 (the least you need: 2 per row)
  1. Lay 3 square foundations straight out from the core wall
  2. Delete all but the far square
  3. Triangles 1 and 2: row 1 back toward the core
  4. Triangles 3 and 4: row 2 back toward the core
  5. Delete the helpers and keep only the last triangle next to the core: that is your 0.80 m gap
  6. Carry the row on along the core wall from that piece: wall frames and floors go on top of it

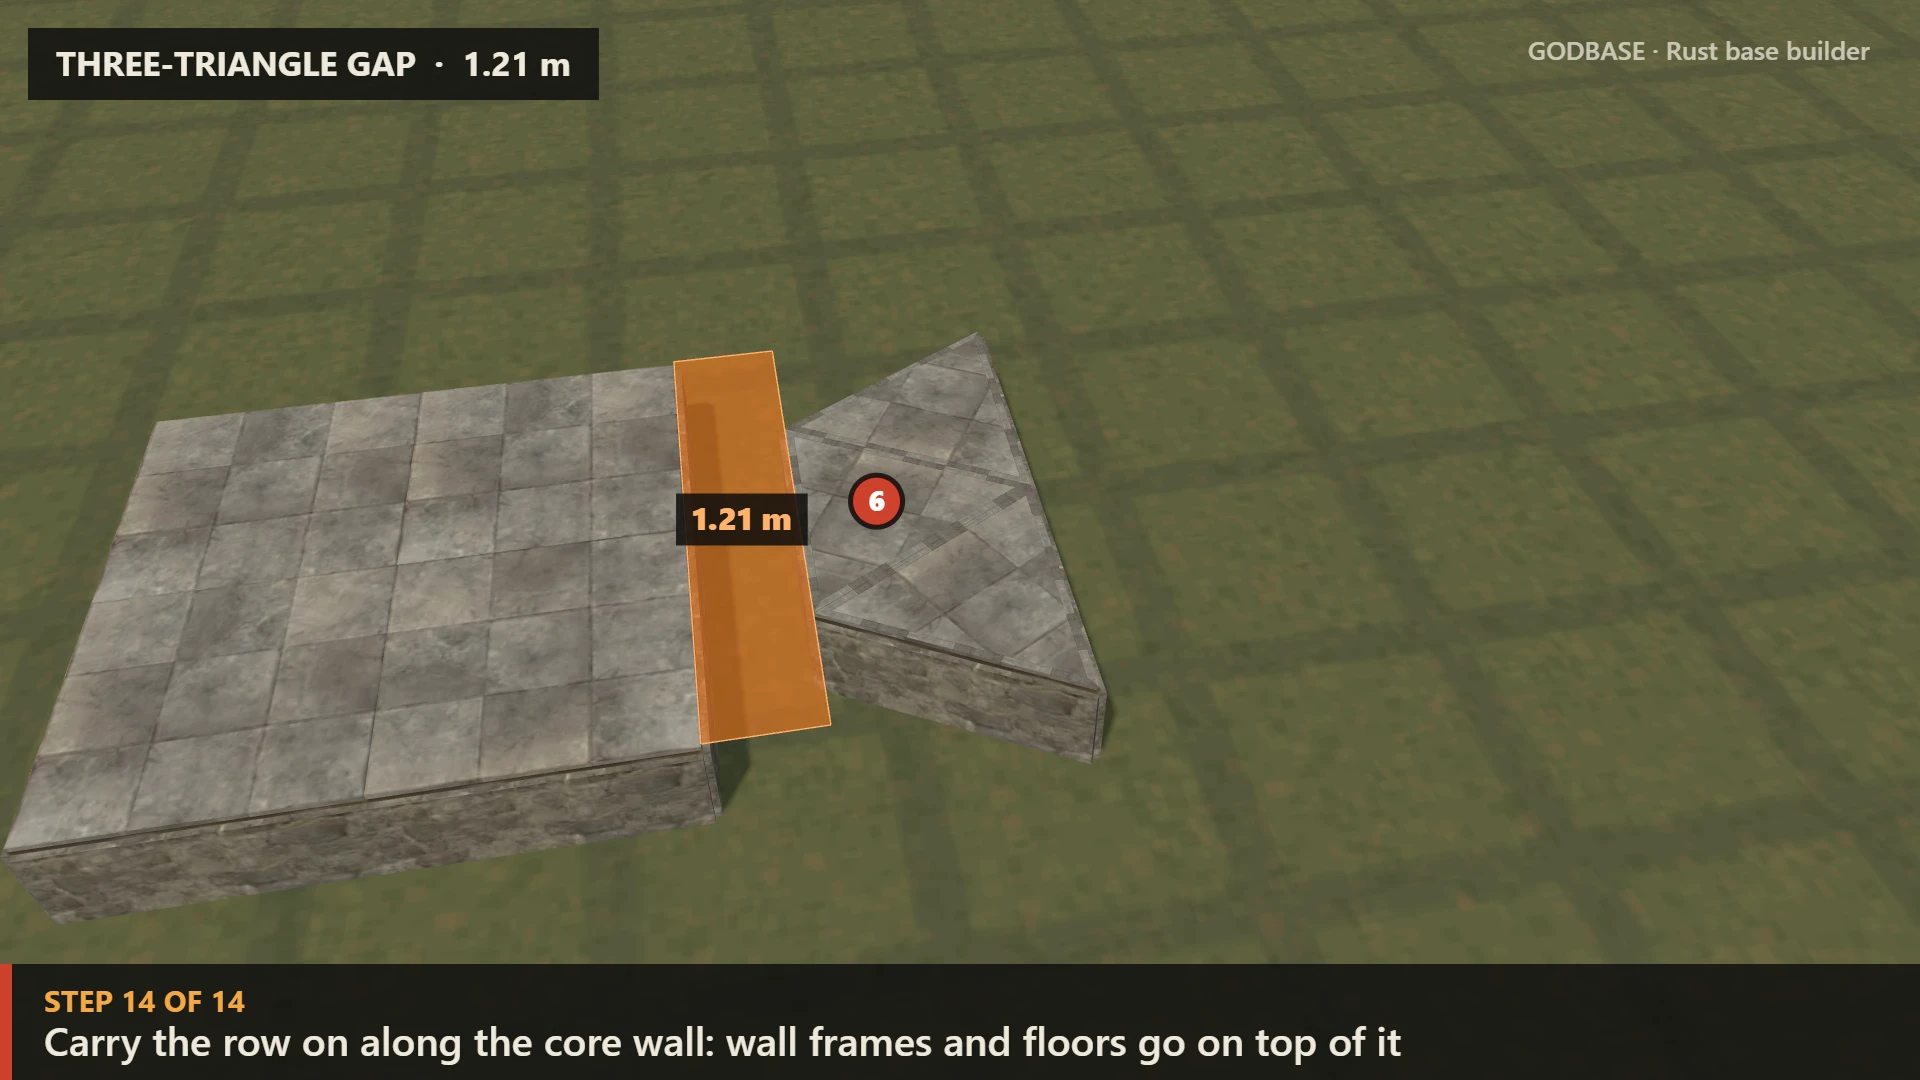
Three-triangle gap

1.21 m
Three-triangle gap: a stone core and a row of triangle foundations 1.21 m away, with the gap marked in orange

A triangle wide gap with three rows of triangles back. Measured in the builder at 1.21 m.

Gap
1.21 m measured (3 × 0.40 m)
Squares out
4, then delete all but the far one
Triangles back
6 (the least you need: 2 per row)
  1. Lay 4 square foundations straight out from the core wall
  2. Delete all but the far square
  3. Triangles 1 and 2: row 1 back toward the core
  4. Triangles 3 and 4: row 2 back toward the core
  5. Triangles 5 and 6: row 3 back toward the core
  6. Delete the helpers and keep only the last triangle next to the core: that is your 1.21 m gap
  7. Carry the row on along the core wall from that piece: wall frames and floors go on top of it

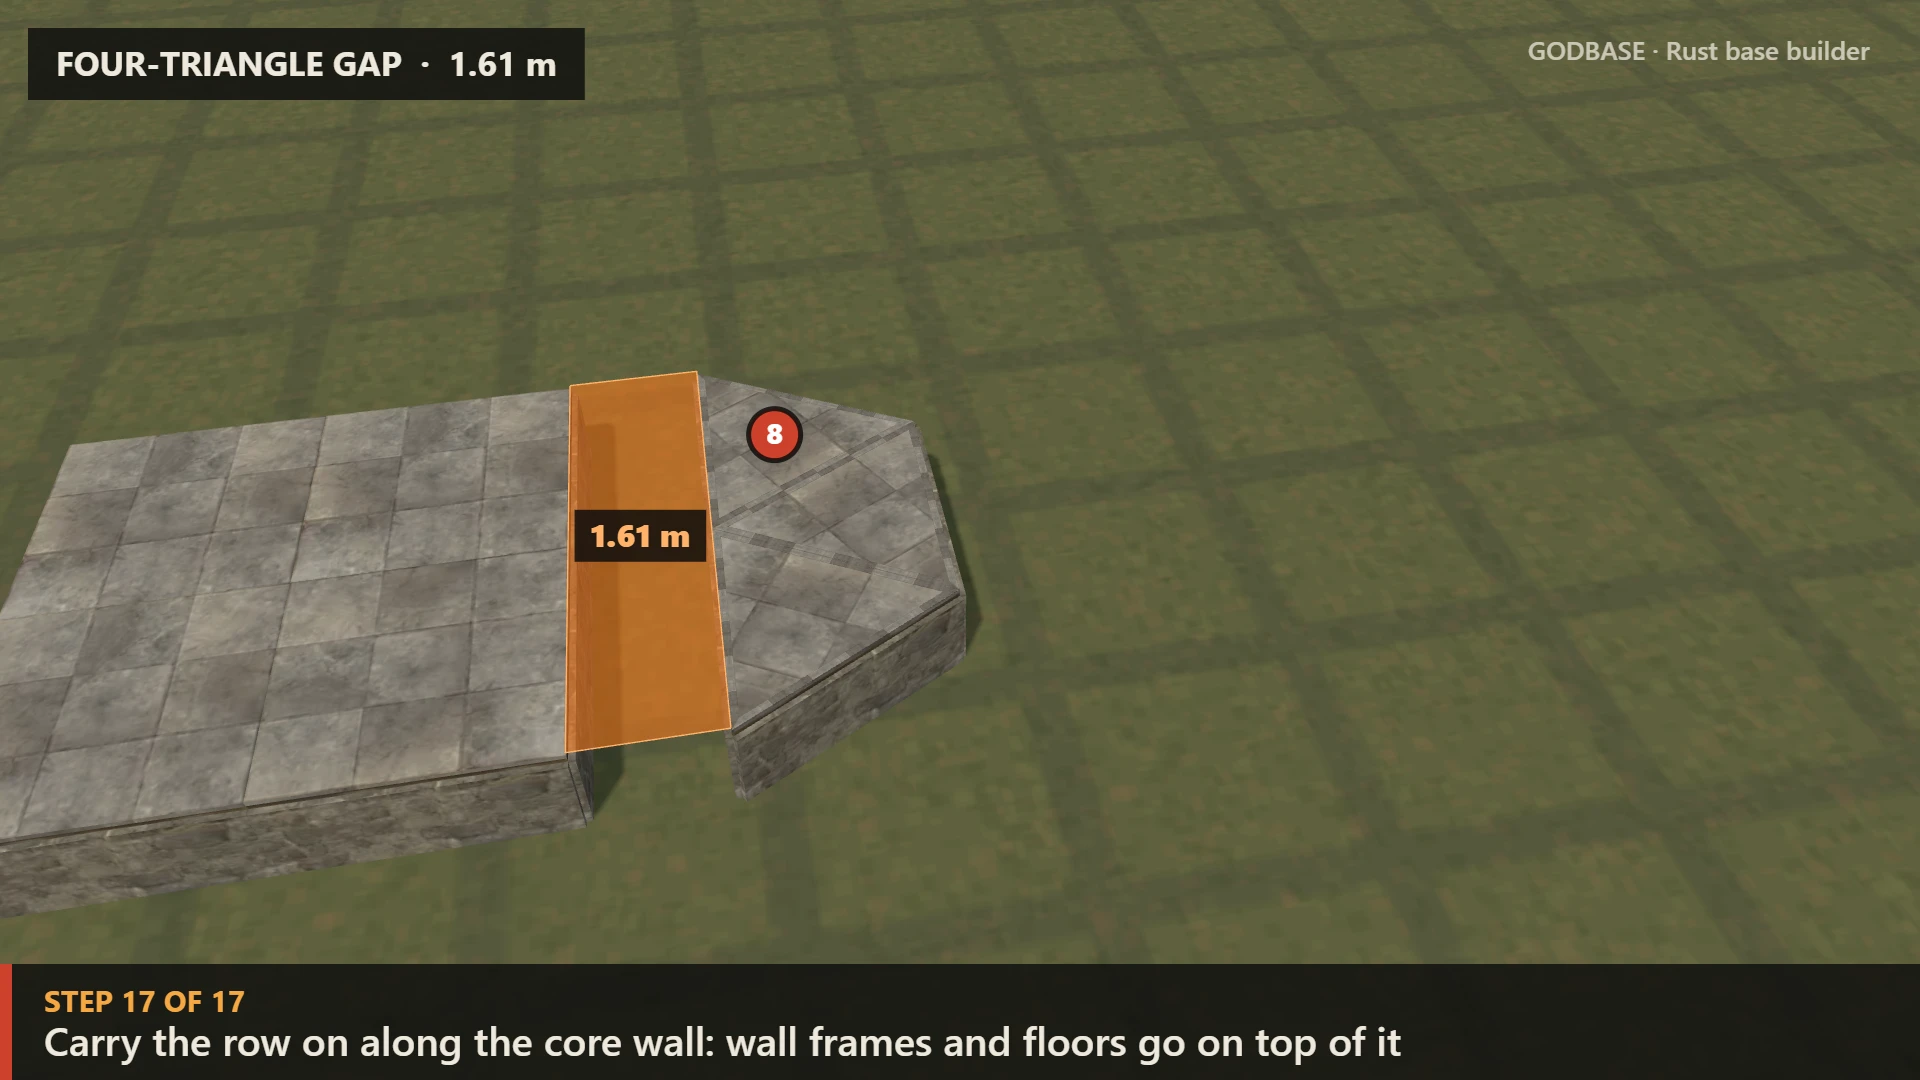
Four-triangle gap

1.61 m
Four-triangle gap: a stone core and a row of triangle foundations 1.61 m away, with the gap marked in orange

A triangle wide gap with four rows of triangles back (5 squares out, as in the LevelSkip guide). Measured in the builder at 1.61 m.

Gap
1.61 m measured (4 × 0.40 m)
Squares out
5, then delete all but the far one
Triangles back
8 (the least you need: 2 per row)
  1. Lay 5 square foundations straight out from the core wall
  2. Delete all but the far square
  3. Triangles 1 and 2: row 1 back toward the core
  4. Triangles 3 and 4: row 2 back toward the core
  5. Triangles 5 and 6: row 3 back toward the core
  6. Triangles 7 and 8: row 4 back toward the core
  7. Delete the helpers and keep only the last triangle next to the core: that is your 1.61 m gap
  8. Carry the row on along the core wall from that piece: wall frames and floors go on top of it

More gap sizes

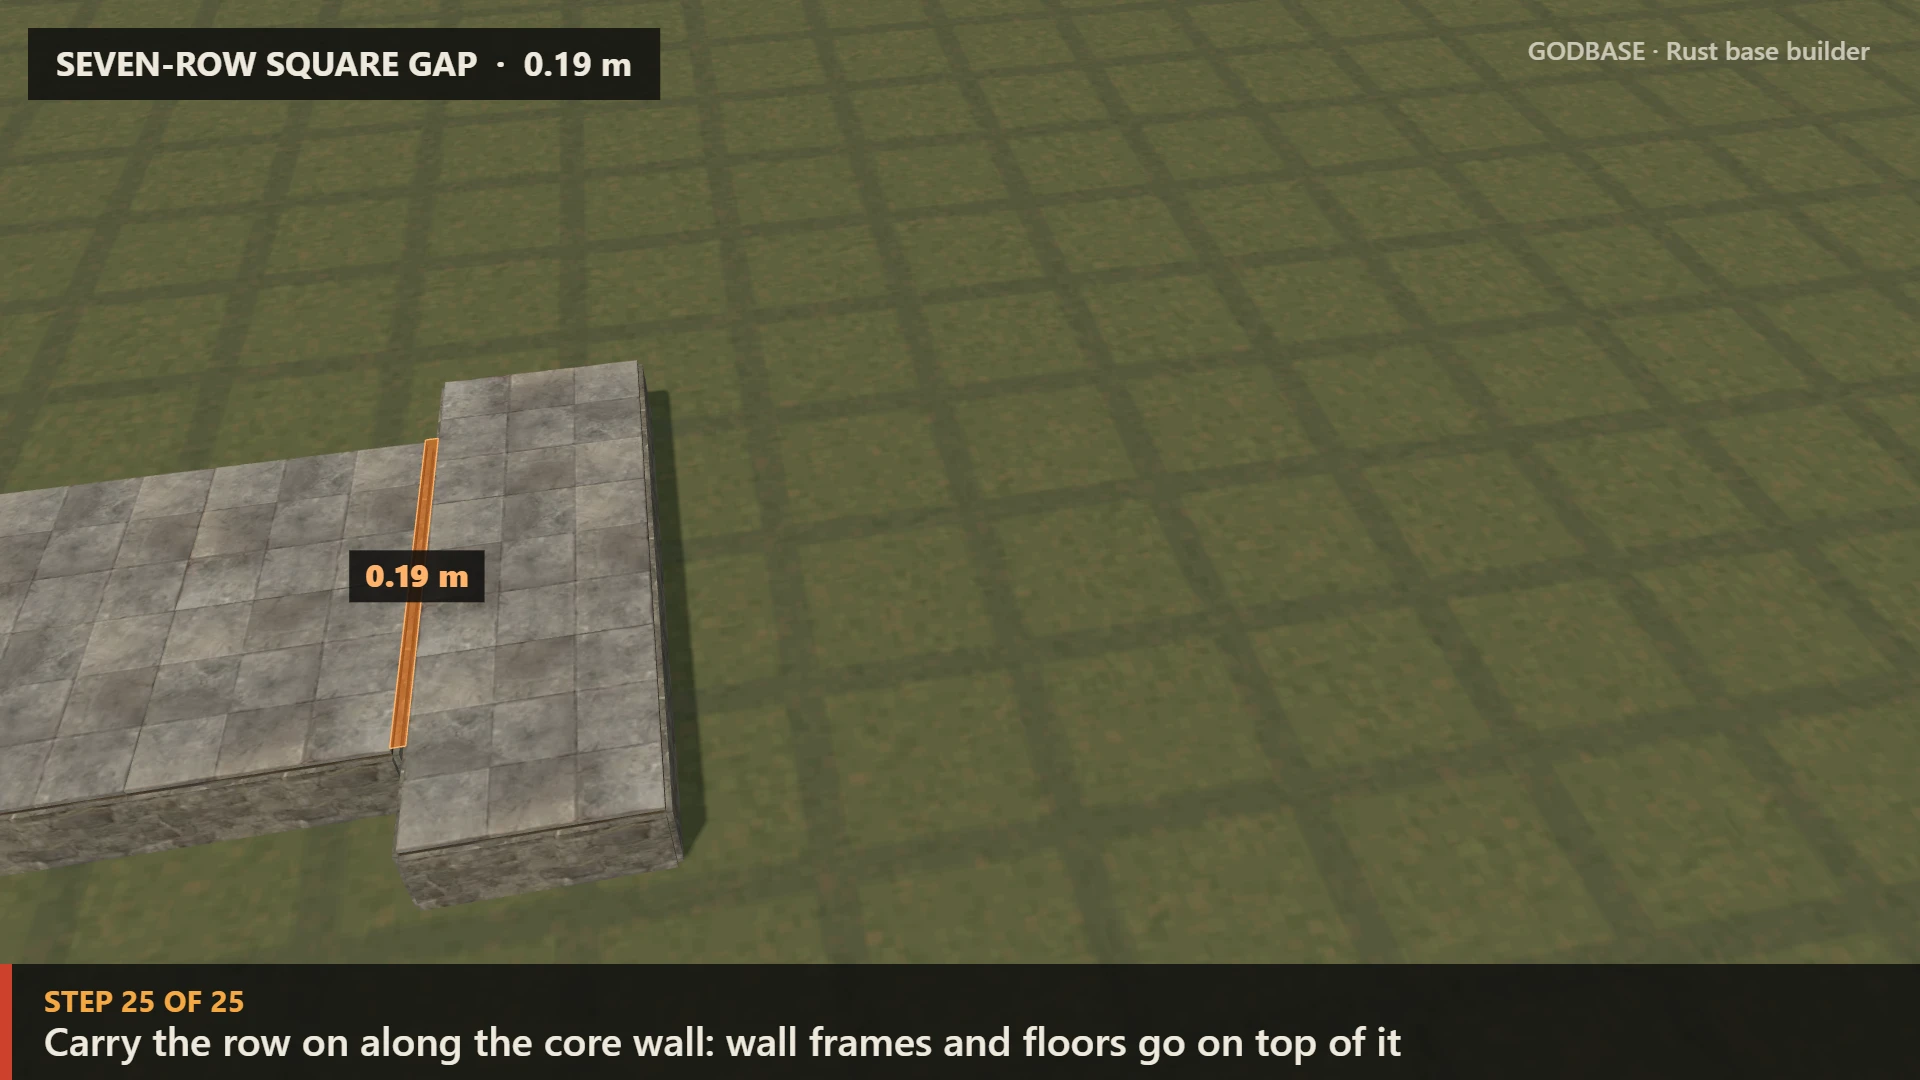
Seven-row square gap

0.19 m
Seven-row square gap: a stone core and its outer foundation row 0.19 m away, with the gap marked
How
7 triangle rows out, 6 squares back
Triangles
14 (2 per row)
Kind
Square wide gap
Steps
  1. Triangles 1 and 2: row 1 out from the core
  2. Triangles 3 and 4: row 2 out from the core
  3. Triangles 5 and 6: row 3 out from the core
  4. Triangles 7 and 8: row 4 out from the core
  5. Triangles 9 and 10: row 5 out from the core
  6. Triangles 11 and 12: row 6 out from the core
  7. Triangles 13 and 14: row 7 out from the core
  8. A square on the end of the last row
  9. Delete the triangles
  10. Bring 6 squares back toward the core
  11. Delete the helpers and keep only the square next to the core: that is your 0.19 m gap
  12. Carry the row on along the core wall from that piece: wall frames and floors go on top of it

Six-row square gap

0.59 m
Six-row square gap: a stone core and its outer foundation row 0.59 m away, with the gap marked
How
6 triangle rows out, 5 squares back
Triangles
12 (2 per row)
Kind
Square wide gap
Steps
  1. Triangles 1 and 2: row 1 out from the core
  2. Triangles 3 and 4: row 2 out from the core
  3. Triangles 5 and 6: row 3 out from the core
  4. Triangles 7 and 8: row 4 out from the core
  5. Triangles 9 and 10: row 5 out from the core
  6. Triangles 11 and 12: row 6 out from the core
  7. A square on the end of the last row
  8. Delete the triangles
  9. Bring 5 squares back toward the core
  10. Delete the helpers and keep only the square next to the core: that is your 0.59 m gap
  11. Carry the row on along the core wall from that piece: wall frames and floors go on top of it

Five-row square gap

0.99 m
Five-row square gap: a stone core and its outer foundation row 0.99 m away, with the gap marked
How
5 triangle rows out, 4 squares back
Triangles
10 (2 per row)
Kind
Square wide gap
Steps
  1. Triangles 1 and 2: row 1 out from the core
  2. Triangles 3 and 4: row 2 out from the core
  3. Triangles 5 and 6: row 3 out from the core
  4. Triangles 7 and 8: row 4 out from the core
  5. Triangles 9 and 10: row 5 out from the core
  6. A square on the end of the last row
  7. Delete the triangles
  8. Bring 4 squares back toward the core
  9. Delete the helpers and keep only the square next to the core: that is your 0.99 m gap
  10. Carry the row on along the core wall from that piece: wall frames and floors go on top of it

Four-row square gap

1.39 m
Four-row square gap: a stone core and its outer foundation row 1.39 m away, with the gap marked
How
4 triangle rows out, 3 squares back
Triangles
8 (2 per row)
Kind
Square wide gap
Steps
  1. Triangles 1 and 2: row 1 out from the core
  2. Triangles 3 and 4: row 2 out from the core
  3. Triangles 5 and 6: row 3 out from the core
  4. Triangles 7 and 8: row 4 out from the core
  5. A square on the end of the last row
  6. Delete the triangles
  7. Bring 3 squares back toward the core
  8. Delete the helpers and keep only the square next to the core: that is your 1.39 m gap
  9. Carry the row on along the core wall from that piece: wall frames and floors go on top of it

Three-row square gap

1.79 m
Three-row square gap: a stone core and its outer foundation row 1.79 m away, with the gap marked
How
3 triangle rows out, 2 squares back
Triangles
6 (2 per row)
Kind
Square wide gap
Steps
  1. Triangles 1 and 2: row 1 out from the core
  2. Triangles 3 and 4: row 2 out from the core
  3. Triangles 5 and 6: row 3 out from the core
  4. A square on the end of the last row
  5. Delete the triangles
  6. Bring 2 squares back toward the core
  7. Delete the helpers and keep only the square next to the core: that is your 1.79 m gap
  8. Carry the row on along the core wall from that piece: wall frames and floors go on top of it

Five-triangle gap

2.01 m
Five-triangle gap: a stone core and its outer foundation row 2.01 m away, with the gap marked
How
6 squares out, 5 triangle rows back
Triangles
10 (2 per row)
Kind
Triangle wide gap
Steps
  1. Lay 6 square foundations straight out from the core wall
  2. Delete all but the far square
  3. Triangles 1 and 2: row 1 back toward the core
  4. Triangles 3 and 4: row 2 back toward the core
  5. Triangles 5 and 6: row 3 back toward the core
  6. Triangles 7 and 8: row 4 back toward the core
  7. Triangles 9 and 10: row 5 back toward the core
  8. Delete the helpers and keep only the last triangle next to the core: that is your 2.01 m gap
  9. Carry the row on along the core wall from that piece: wall frames and floors go on top of it

Two-row square gap

2.20 m
Two-row square gap: a stone core and its outer foundation row 2.20 m away, with the gap marked
How
2 triangle rows out, 1 square back
Triangles
4 (2 per row)
Kind
Square wide gap
Steps
  1. Triangles 1 and 2: row 1 out from the core
  2. Triangles 3 and 4: row 2 out from the core
  3. A square on the end of the last row
  4. Delete the triangles
  5. Bring 1 square back toward the core
  6. Delete the helpers and keep only the square next to the core: that is your 2.20 m gap
  7. Carry the row on along the core wall from that piece: wall frames and floors go on top of it

Six-triangle gap

2.41 m
Six-triangle gap: a stone core and its outer foundation row 2.41 m away, with the gap marked
How
7 squares out, 6 triangle rows back
Triangles
12 (2 per row)
Kind
Triangle wide gap
Steps
  1. Lay 7 square foundations straight out from the core wall
  2. Delete all but the far square
  3. Triangles 1 and 2: row 1 back toward the core
  4. Triangles 3 and 4: row 2 back toward the core
  5. Triangles 5 and 6: row 3 back toward the core
  6. Triangles 7 and 8: row 4 back toward the core
  7. Triangles 9 and 10: row 5 back toward the core
  8. Triangles 11 and 12: row 6 back toward the core
  9. Delete the helpers and keep only the last triangle next to the core: that is your 2.41 m gap
  10. Carry the row on along the core wall from that piece: wall frames and floors go on top of it

Seven-triangle gap

2.81 m
Seven-triangle gap: a stone core and its outer foundation row 2.81 m away, with the gap marked
How
8 squares out, 7 triangle rows back
Triangles
14 (2 per row)
Kind
Triangle wide gap; a triangle fits inside it
Steps
  1. Lay 8 square foundations straight out from the core wall
  2. Delete all but the far square
  3. Triangles 1 and 2: row 1 back toward the core
  4. Triangles 3 and 4: row 2 back toward the core
  5. Triangles 5 and 6: row 3 back toward the core
  6. Triangles 7 and 8: row 4 back toward the core
  7. Triangles 9 and 10: row 5 back toward the core
  8. Triangles 11 and 12: row 6 back toward the core
  9. Triangles 13 and 14: row 7 back toward the core
  10. Delete the helpers and keep only the last triangle next to the core: that is your 2.81 m gap
  11. Carry the row on along the core wall from that piece: wall frames and floors go on top of it

Mini SHELL: how the shell starts

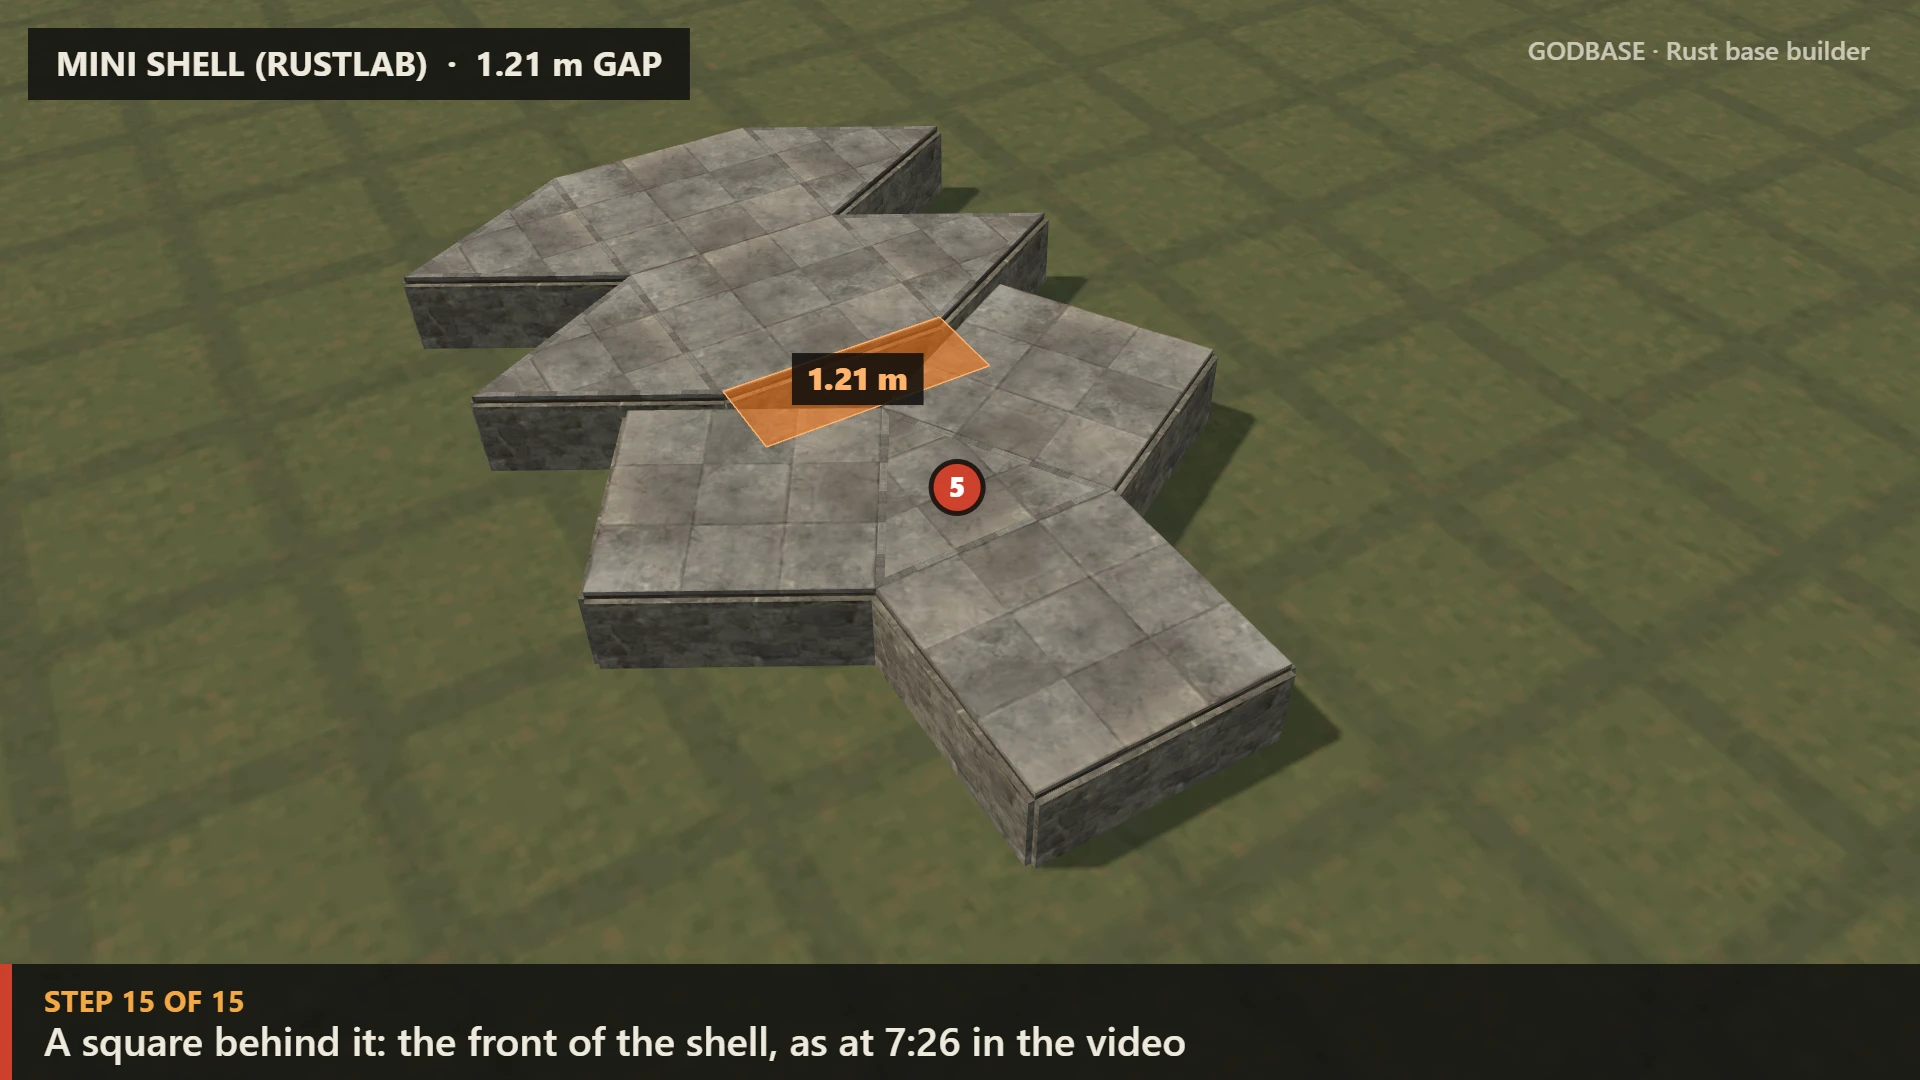
1.21 m gap
The start of the Mini SHELL: a stone 2x1 core with side triangles, a triangle pointing at the door 1.21 m away, a square turned 30 degrees on each side of it and one behind it

A shell is an outer ring of foundations round your core that sits off the core's grid, so nothing snaps across. RustLab's Mini SHELL (solo/duo, 14 September 2026) starts its shell with the same wide-gap trick, right in front of the door. This is that start, rebuilt piece by piece to match the video's overhead view at 7:26.

Core
2x1 with a triangle on each side (the video's starter and expansions)
Gap
1.21 m measured: the three-triangle gap
Triangles
5: numbers 1 to 4 are helpers you delete
  1. Lay 4 square foundations straight out from the door
  2. Delete all but the far square
  3. Triangles back toward the door: 3 rows, the last one is a single triangle
  4. Delete the helpers and keep only triangle 5, pointing at the door: a 1.21 m gap
  5. A square on each side of the triangle: they turn 30 degrees and follow the core
  6. A square behind the triangle: the front of the shell, as in the video at 7:26

The video doesn't say the gap size. We measured it: in the builder, a triangle centred on the door only gets a square on both sides once the gap is 1.21 m (one or two triangle rows are blocked by the core or end up off-centre). In the video the server copies each piece to the other side for you (its menu has a Symmetry tool, from 6:02); in the game you place each side yourself. The rest of the ring (7:08), the shooting floor (9:20) and the extra tool cupboards (15:20) are in the video; we haven't rebuilt those yet.

What goes on top of the gap

  • Wall frames on the outer foundations, square floors on the frames. That floor is the shooting floor; it stops at the gap, so you look straight down the core wall. (LevelSkip; RustBases.gg)
  • Its own tool cupboard. The build-out sticks out past your base, so it usually gets an external TC or it decays. (LevelSkip; RustBases.gg)
  • Linking back to the main TC is possible: a half-height floor inside the main wall where the shooting floor joins, and half walls on the connecting triangles. (LevelSkip) Most builders keep it separate, on its own TC. (RustBases.gg)
  • Electrical deployables in the wall frame sockets stop raiders placing twig in them. (Corrosion Hour, Armada design 2021)
  • Who it suits: it costs extra frames, floors and a TC, so trios and bigger groups get the most from it; solos often use embrasures instead. (RustBases.gg)
  • Round the corners: the Mini SHELL above shows how one shell starts at the door; how it carries on round the core is in RustLab's video, and Kredbic covers connections too (September 2026). We only rebuild what a video shows clearly.

Before you rely on it

  • Check it. Put a wall frame on the outer foundation and a floor on the frame. The floor must stop short of the core wall with an open slit, because that slit is the wide gap. If it snaps onto the core, the foundation is back on the grid: delete it and redo the steps.
  • Older videos. The July 2025 stability change ended "disconnectable TC" tricks. (Facepunch, Friends with Benefits) If an older wide-gap design uses one, test it before you copy it.
  • Upkeep. Since the September 2026 update, a TC's upkeep grows with how many players are authorised on it, and that includes a wide gap's external TC. (Physgun's summary of Breach and Clear) No patch we found changed wide gaps themselves, and they were still taught in September 2026. (Kredbic)

Sources: LevelSkip: How to Make Widegap Peeks (2023); RustBases.gg: What are wide gaps (21 April 2026); Kredbic: How to Build Wide Gaps CORRECTLY in Rust (10 September 2026); Corrosion Hour: The Armada (2021); Facepunch: Friends with Benefits (July 2025); Physgun: Rust September 2026 update; RustLab: Mini SHELL Solo/Duo (14 September 2026). Kinds named in Maphhew's Wide Gap Shooting Floor Tutorial (2022). Gap widths, triangle counts and step orders are measured and built piece by piece in Godbase's 3D builder (its snapping follows the game's foundation sizes: square 3 m, triangle 2.598 m deep). Pictures: made in the builder with Facepunch's own Rust models. Checked 30 September 2026.